Title here
Summary here
You’ve just joined CityFlow, a small mobility-analytics team whose public dashboard runs on New York City taxi data — the same dataset you worked with if you took the Python or PySpark courses in this path. Your job in this course is different from those: instead of analyzing the data, you’re going to make sure the pipeline that produces it runs identically no matter whose laptop, whose server, or whose Kubernetes cluster it lands on. That guarantee starts with a single piece of software: Docker Desktop.
This lesson has one goal — get Docker actually installed and actually working on your machine, and prove it with real output rather than trust. You won’t touch a line of “why containers matter” theory yet; that’s Lesson 2, once you have something real to compare it against. Right now, you’re installing a tool.
By the end of this lesson, you will be able to:
docker --version and a real docker run hello-world.You don’t need any programming experience for this lesson — just a computer with a few gigabytes of free disk space and an internet connection. Let’s install it.
Docker Desktop is a desktop application — a normal app you install like any other — but under the hood it sets up three distinct pieces:
docker CLI. The command you’ll type in a terminal, on every operating system, from this lesson to the end of the course.docker run behaves identically whether you’re on a Mac, a Windows PC, or a Linux box. You will not manage this VM directly — Docker Desktop does it for you.dockerd), running inside that VM (or natively on Linux). This is the process that actually pulls images, builds them, and starts and stops your containers.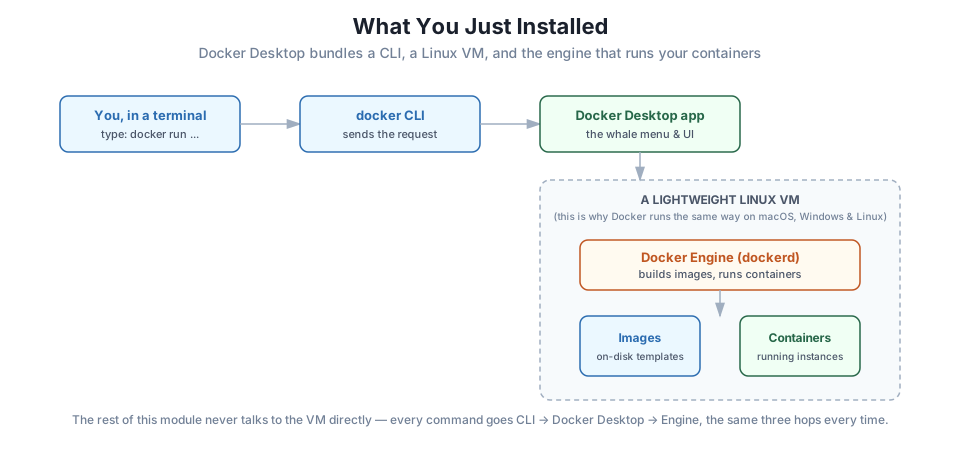
Knowing this shape matters later. When something goes wrong, you’ll know to ask “is the engine running?” rather than treating Docker as a black box.
This step was verified firsthand on this pipeline’s own machine, an Apple Silicon Mac, following Docker’s current official documentation at docs.docker.com/desktop/setup/install/mac-install/.
Docker Desktop supports the current release of macOS plus the two previous major releases, and needs at least 4 GB of RAM. You also need to know which chip your Mac has:
docker.com/products/docker-desktop/ and download the installer for your chip — Docker Desktop for Mac with Apple silicon or Docker Desktop for Mac with Intel chip. Downloading the wrong one is the single most common install mistake; the site detects your chip automatically, but it’s worth double-checking.Docker.dmg to open the installer, then drag the Docker icon into the Applications folder — the same drag-to-install pattern every Mac app uses.This machine already had Docker Desktop installed
This lesson’s install steps come directly from Docker’s own current documentation, verified live while writing this course. The screenshots and command output later in this lesson, however, come from a machine where Docker Desktop was already installed and running before this course was written — re-installing it from scratch would have disrupted other running work on that machine. Every verification step below (docker --version, docker run hello-world, and the Docker Desktop screenshot) is real output from that real, working installation — nothing here is invented — but the installer wizard itself was not re-captured fresh for this lesson. If you’re installing for the first time, your screens will match the steps described above exactly.
Windows steps are written from Docker’s current official documentation at docs.docker.com/desktop/setup/install/windows-install/ — this pipeline’s machine is a Mac, so these steps are sourced and labeled as documentation rather than independently verified firsthand.
Docker Desktop on Windows runs on the WSL 2 (Windows Subsystem for Linux) backend, which needs:
docker.com/products/docker-desktop/.If you prefer the command line, Docker also supports a silent per-user install with no administrator rights: "Docker Desktop Installer.exe" install --user.
Linux steps are likewise sourced from Docker’s current official documentation at docs.docker.com/desktop/setup/install/linux/, labeled as documentation rather than independently verified on this pipeline’s Mac.
Docker Desktop for Linux supports Ubuntu, Debian, Fedora, RHEL, and (experimentally) Arch, and needs a 64-bit kernel with KVM virtualization support, systemd, and a supported desktop environment (GNOME, KDE, or MATE). On Ubuntu specifically, the install is a single .deb package:
sudo apt-get update
sudo apt install ./docker-desktop-amd64.deb
You may see a permission-related warning at the end of that command; Docker’s own documentation says it’s safe to ignore. Launch Docker Desktop from your application menu, or from a terminal with systemctl --user start docker-desktop, and accept the Subscription Service Agreement on first launch.
docker --versionWhichever platform you installed on, the first check is the same everywhere. Open a terminal and ask Docker to identify itself:
docker --versionDocker version 29.6.1, build 8900f1dIf you see a version string like this, the docker CLI is installed and can talk to the engine. If instead you get command not found, the install didn’t complete, or your terminal needs to be restarted to pick up the new PATH entry.
A version string only proves the CLI exists. To prove the whole stack — CLI, engine, and the ability to pull and run something — run Docker’s own tiny test image:
docker run hello-worldUnable to find image 'hello-world:latest' locally
latest: Pulling from library/hello-world
58dee6a49ef1: Pulling fs layer
58dee6a49ef1: Download complete
58dee6a49ef1: Pull complete
Digest: sha256:c3cbe1cc1aa588a64951ac6286e0df7b27fe2e6324b1001c619bb358770c0178
Status: Downloaded newer image for hello-world:latest
Hello from Docker!
This message shows that your installation appears to be working correctly.
To generate this message, Docker took the following steps:
1. The Docker client contacted the Docker daemon.
2. The Docker daemon pulled the "hello-world" image from the Docker Hub.
(arm64v8)
3. The Docker daemon created a new container from that image which runs the
executable that produces the output you are currently reading.
4. The Docker daemon streamed that output to the Docker client, which sent it
to your terminal.
To try something more ambitious, you can run an Ubuntu container with:
$ docker run -it ubuntu bash
Share images, automate workflows, and more with a free Docker ID:
https://hub.docker.com/
For more examples and ideas, visit:
https://docs.docker.com/get-started/Read the first two lines carefully: Unable to find image 'hello-world:latest' locally, then Pulling from library/hello-world. That’s real, and it’s worth pausing on. You did not have this image five seconds ago. Docker’s engine noticed, reached out to Docker Hub — a public registry of images — downloaded a small image built specifically to prove an install works, and ran it as a container, all from one command. The four numbered steps in the output are Docker explaining, in plain English, exactly what it just did on your behalf.
Run it again
Try docker run hello-world a second time. The Unable to find image... Pulling from... lines disappear — Docker already has the image on disk, so it skips straight to running it. You’ve just seen the difference between an image (downloaded once, stored locally) and a container (created fresh, possibly many times, from that image) — the exact distinction Lesson 3 builds on.
The command line proves Docker works; Docker Desktop’s interface shows you the same information visually, which matters once you’re juggling several containers at once instead of reading raw text. Open the app and look at the Containers page.
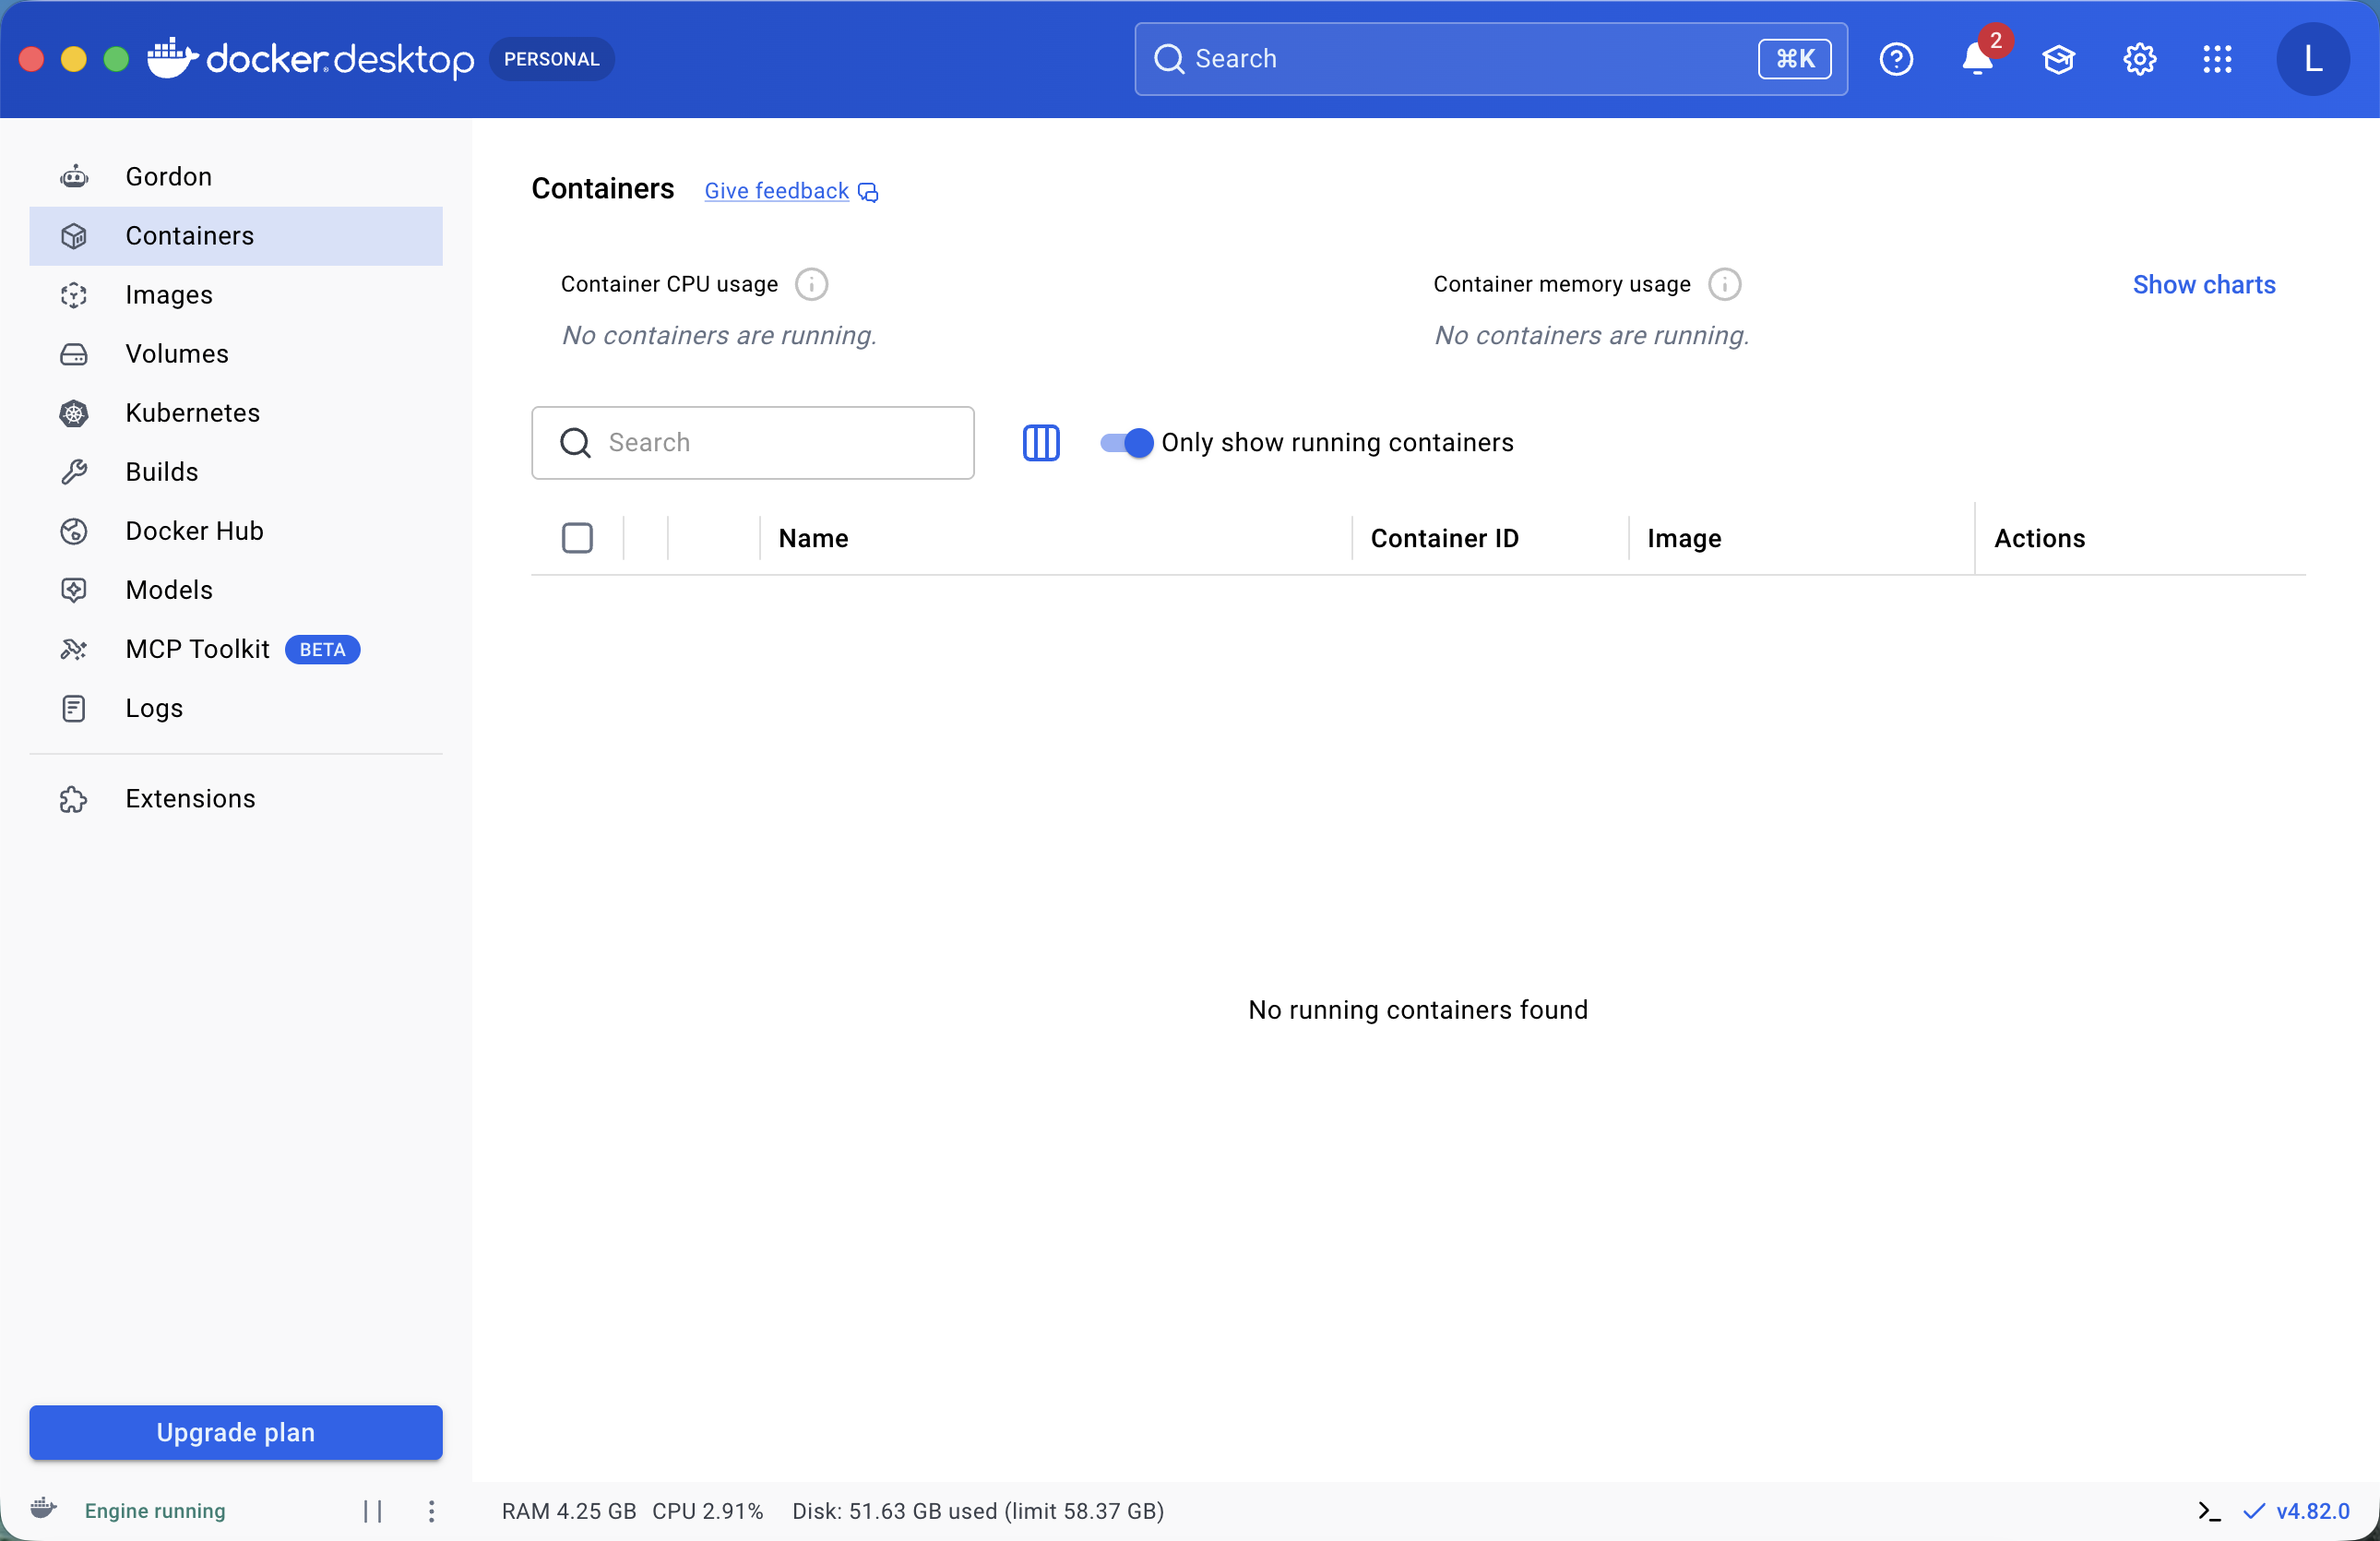
Two details are worth knowing how to find on your own install: the “Engine running” indicator in the bottom-left corner (if it ever says anything else, docker commands will fail with a connection error), and the version number next to it, which should match — or be close to — what docker --version printed on the command line.
On your own machine, run docker --version and docker run hello-world. Read the pull output line by line and identify which line tells you the image was not already present locally, and which line tells you the container actually ran.
Hint
Look for Unable to find image ... locally (proves it needed to download) versus the Hello from Docker! banner (proves a container was created from that image and its output reached your terminal).
Run docker run hello-world a second time immediately after the first. Compare the two outputs line by line and write down, in your own words, what specifically was skipped the second time and why.
Hint
The pulling lines vanish because the image is now cached locally — only the container-creation step happens again. This is your first hands-on look at images being reused across multiple container runs, which Lesson 3 covers formally.
Open Docker Desktop on your own machine and locate the running/stopped indicator for the engine (the same “Engine running” text this lesson’s screenshot shows). Note its exact wording and where it sits in the window.
Hint
It’s in the bottom-left corner of the Docker Desktop window on every current version. If your engine is ever stopped, every docker command in a terminal will fail immediately with a connection error — checking this corner is often the fastest first debugging step.
You installed Docker Desktop — following Docker’s own current documentation for your operating system — and, more importantly, you proved it actually works with real commands rather than trusting the installer. docker --version confirmed the CLI talks to the engine. docker run hello-world proved the full pull-then-run pipeline: Docker noticed the image was missing, pulled it from Docker Hub, created a container from it, and streamed the container’s output back to your terminal. You also saw Docker Desktop’s own Containers page and its “Engine running” indicator — the visual version of the same proof.
docker CLI, a lightweight Linux VM, and Docker Engine (dockerd) into one install, so containers behave the same way on macOS, Windows, and Linux.docker --version — confirms the CLI is installed and can reach the engine; the fastest first health check.docker run hello-world — a real end-to-end test: pull an image if it’s missing, create a container from it, run it, and print its output.docker run hello-world had to pull the image; the second one didn’t, because the image was already stored locally while the container itself is created fresh each time.Every technique in the rest of this course — building images, running services, orchestrating them on Kubernetes — assumes you have a working Docker install and know how to prove it’s working when something breaks. “It’s not working” is a much easier problem to debug once you know it decomposes into three checkable pieces: is the engine running, does the CLI reach it, and does a known-good image (hello-world) run successfully. You now have all three checks in your hands.
Docker is installed and verified. But you still haven’t seen why it matters — only that it works. In Lesson 2, you’ll reproduce a real “works on my machine” bug: the exact same script, unmodified, failing on one Python installation and succeeding on another. Once you’ve felt that problem firsthand, Docker’s whole reason for existing stops being an abstraction and becomes something you’ve personally watched happen — and fixed.
Keep DATATWEETS free. Help fund practical data, AI, and engineering lessons for learners worldwide.