Title here
Summary here
Across this module you’ve installed Docker, reproduced a real “works on my machine” bug and fixed it with a container, built the images-versus-containers mental model, and run a genuine Postgres service you verified layer by layer. This project puts all four pieces to work at once, on a small, original scenario: CityFlow’s smoke test — a quick, repeatable check the team runs to confirm the database, the seeding step, and the reporting step all still talk to each other correctly.
You’ll run three containers — one long-running database and two short-lived clients — connected by a Docker network you create yourself, moving five real trips from CityFlow’s actual dataset from one container to another and back out as a report. Nothing here is simulated; every number in this lesson is the real output of the commands as written.
By the end of this project, you will be able to:
docker run.CityFlow’s smoke test has three moving pieces:
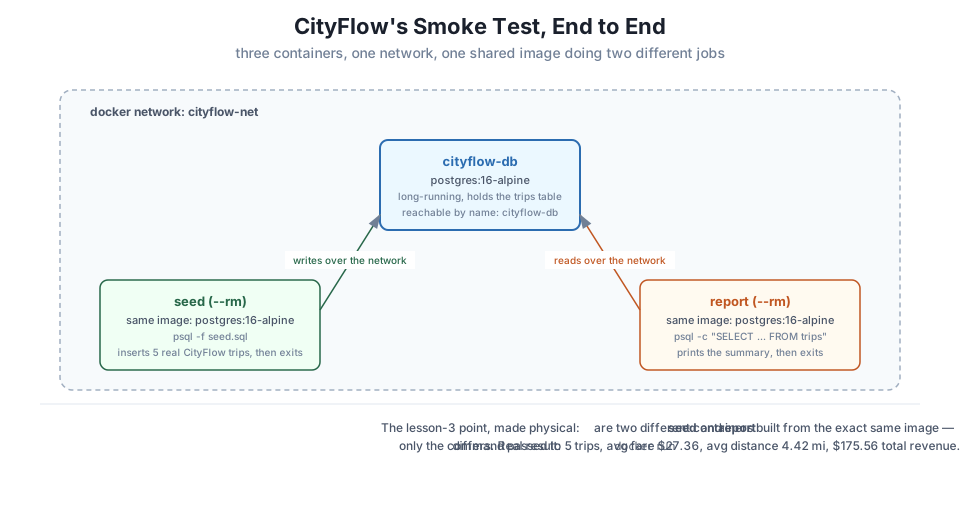
cityflow-db — a Postgres container, exactly like Lesson 4’s, except this time it joins a network you create explicitly instead of relying on Docker’s default network.seed — a throwaway container that connects to cityflow-db by container name, creates a trips table, and inserts five real CityFlow trips. It runs once and exits.report — a second throwaway container, built from the same image as seed, that connects to cityflow-db and prints a small summary report. It also runs once and exits.Both seed and report use the official postgres:16-alpine image purely as a psql client — no application code, no custom image, just the same image from Lesson 4 given a different command each time. That’s a deliberate callback to Lesson 3: one image, multiple container roles, decided entirely by what you pass to docker run.
docker network create cityflow-netaa88fc51f3fb5b74ba686fda142858f2885400d591179f82e85f427391a0af72A Docker network is a private, isolated communication channel between containers. Any container you attach to cityflow-net can reach any other container on it by name — no IP addresses to look up, no port-mapping to the host required, because these containers only need to talk to each other, not to you.
docker run -d --name cityflow-db --network cityflow-net \
  -e POSTGRES_PASSWORD=cityflow -e POSTGRES_DB=cityflow \
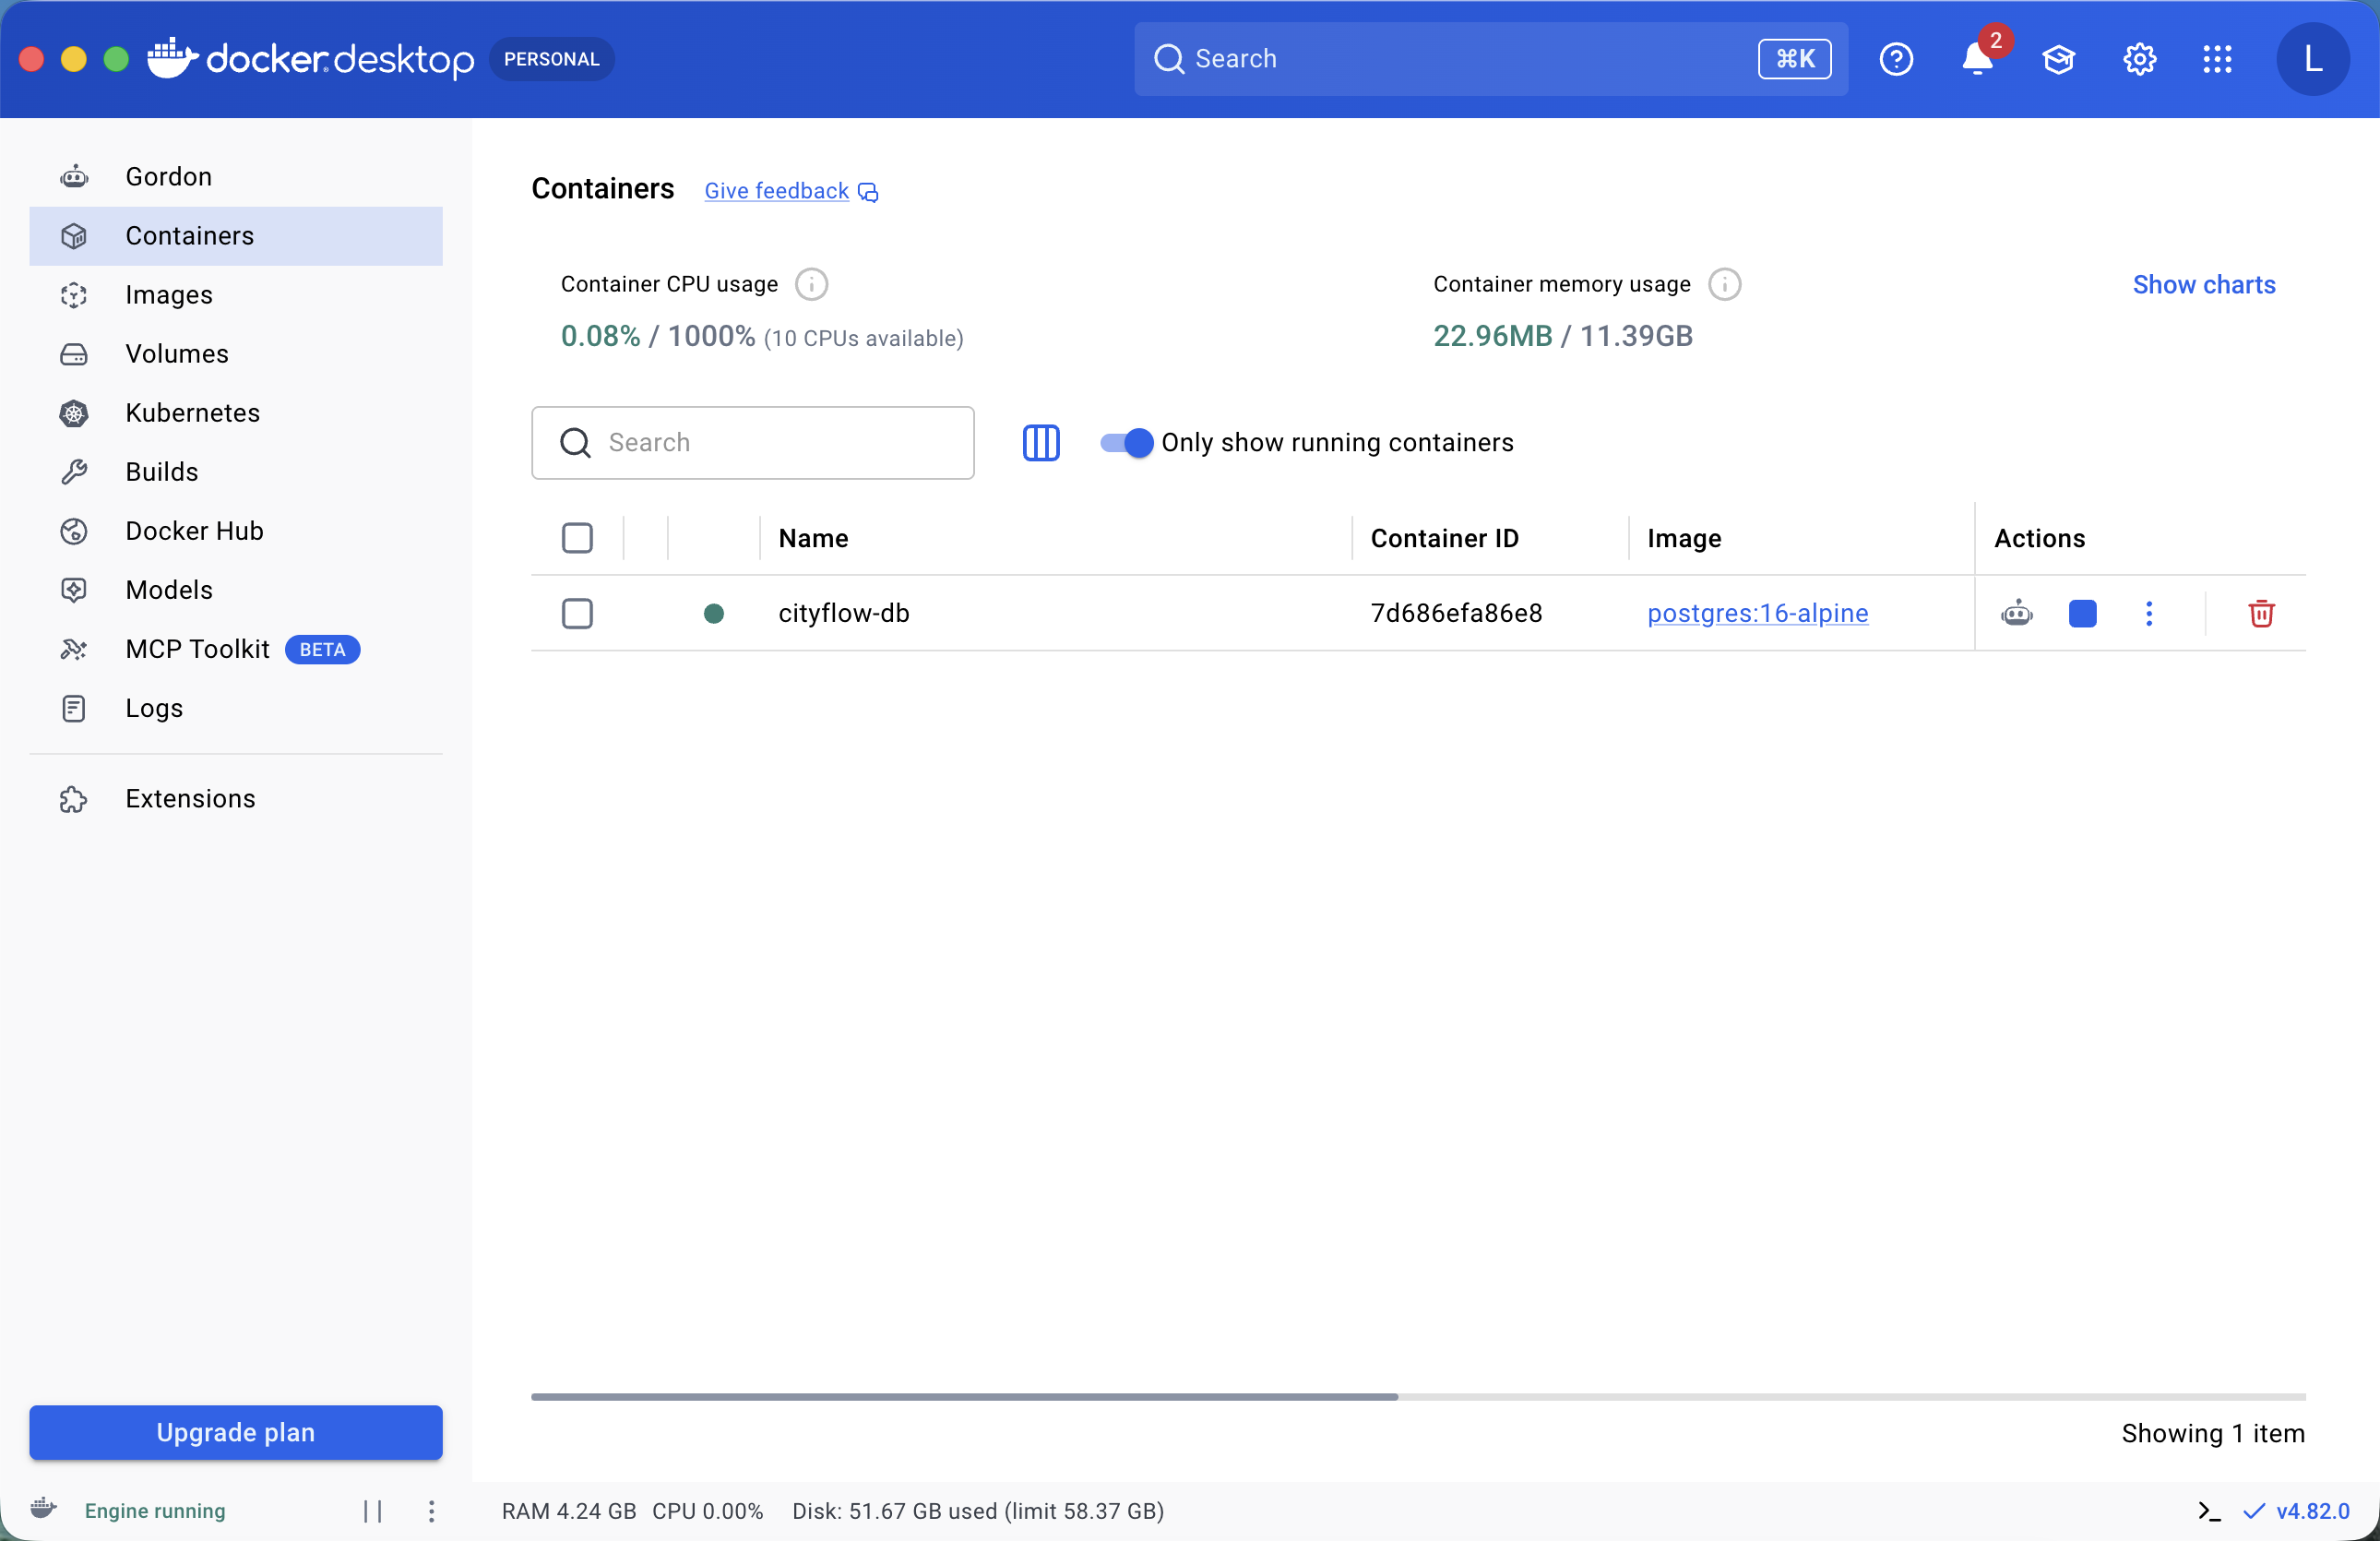
postgres:16-alpine7d686efa86e816ba6619e3d871ac2b414f7d8f74e14e24bcbe8c6f7bdd55ca26docker ps --filter "name=cityflow"CONTAINER ID IMAGE COMMAND CREATED STATUS PORTS NAMES
7d686efa86e8 postgres:16-alpine "docker-entrypoint.s…" 3 seconds ago Up 3 seconds 5432/tcp cityflow-dbNotice there’s no -p flag this time, and the PORTS column just shows 5432/tcp rather than a host mapping — unlike Lesson 4, this database doesn’t need to be reachable from your host machine at all. Only its network-mates need to reach it, and --network cityflow-net is what makes that possible.
Write a small SQL script with five real trips drawn from CityFlow’s own teaching dataset:
-- CityFlow smoke-test seed data: five real trips from the CityFlow
-- teaching sample (datatweets.com/datasets/nyc-taxi/yellow_tripdata_sample.csv).
CREATE TABLE IF NOT EXISTS trips (
    pickup_ts       TIMESTAMP,
    dropoff_ts      TIMESTAMP,
    passenger_count NUMERIC,
    trip_distance   NUMERIC,
    pu_zone         INTEGER,
    do_zone         INTEGER,
    payment_type    INTEGER,
    fare_amount     NUMERIC,
    tip_amount      NUMERIC,
    total_amount    NUMERIC
);

TRUNCATE trips;

INSERT INTO trips VALUES
    ('2023-12-31 23:56:46', '2024-01-01 00:12:06', 2,    2.38, 236, 142, 1, 15.60, 1.00, 21.60),
    ('2023-12-31 23:58:35', '2024-01-01 00:13:06', 6,    8.39, 138, 217, 2, 33.10, 0.00, 42.35),
    ('2024-01-01 00:00:17', '2024-01-01 00:07:46', 1,    2.35, 161,  75, 1, 12.10, 3.42, 20.52),
    ('2024-01-01 00:01:39', '2024-01-01 01:02:53', 1,    2.59, 161, 246, 2, 47.10, 0.00, 52.10),
    ('2024-01-01 00:02:21', '2024-01-01 00:18:59', NULL, 6.40,  48, 116, 0, 28.90, 5.09, 38.99);
Save that as seed.sql, then run a second, disposable container — built from the same postgres:16-alpine image as the database — to execute it against cityflow-db over the network:
docker run --rm --network cityflow-net -v "$(pwd)":/sql -e PGPASSWORD=cityflow \
  postgres:16-alpine psql -h cityflow-db -U postgres -d cityflow -f /sql/seed.sql
CREATE TABLE
TRUNCATE TABLE
INSERT 0 5Look closely at -h cityflow-db. That is not an IP address or a localhost port mapping — it’s the container name you chose in Step 2, and Docker’s network resolves it automatically for any container attached to cityflow-net. This container ran psql, connected to another container purely by name, executed the SQL file, and — because this docker run had no -d, and included --rm — exited and deleted itself the instant the script finished.
Now run a third container, from the identical image again, this time just to read the data back and summarize it:
docker run --rm --network cityflow-net -e PGPASSWORD=cityflow \
  postgres:16-alpine psql -h cityflow-db -U postgres -d cityflow -c \
  "SELECT COUNT(*) AS trips, ROUND(AVG(fare_amount), 2) AS avg_fare, ROUND(AVG(trip_distance), 2) AS avg_distance, ROUND(SUM(total_amount), 2) AS total_revenue FROM trips;"
trips | avg_fare | avg_distance | total_revenue
-------+----------+--------------+---------------
5 | 27.36 | 4.42 | 175.56
(1 row)Five trips, a real average fare of $27.36, a real average distance of 4.42 miles, and $175.56 in total revenue — all computed by Postgres from the exact five rows the seed container inserted two steps ago, read back by a container that has never seen that data before this exact query.
You can also ask Docker directly which containers are attached to cityflow-net right now:
docker network inspect cityflow-net --format '{{range .Containers}}{{.Name}}: {{.IPv4Address}}{{"\n"}}{{end}}'cityflow-db: 172.26.0.2/16Only cityflow-db shows up — because seed and report were both run with --rm and had already exited and been removed by the time this command ran. That’s expected: they did their one job and disappeared, exactly like a good batch task should. cityflow-db is the only container in this project meant to still be here.
Smoke tests should leave nothing behind. Remove the database container and the network:
docker rm -f cityflow-db
docker network rm cityflow-net
cityflow-db
cityflow-netBoth commands print back the name of what they removed — the same confirmation pattern you’ve seen since docker rm in Lesson 3. After this, docker ps -a --filter "name=cityflow" returns nothing, and docker network ls no longer lists cityflow-net. The whole project — three containers, one network, five real trips, a working report — leaves exactly zero trace once you’re done with it, which is exactly what you want from something you’ll run again tomorrow.
Trace the five steps back to the four lessons that led here. Lesson 1 gave you a working Docker install and the confidence to verify it rather than assume it. Lesson 2 is the reason CityFlow uses containers for this at all — the seed and report containers carry their own psql client, so this smoke test behaves identically regardless of what’s installed on whichever machine runs it. Lesson 3’s image-versus-container model is why one image (postgres:16-alpine) could play two completely different roles here, just by changing the command. And Lesson 4’s layered verification — process running, service ready, reachable — is exactly what you leaned on when seed had to connect to cityflow-db correctly before it could insert a single row.
Run all five steps yourself, in order, on your own machine. Confirm your report query returns the same five-trip, $27.36-average-fare result shown in this lesson. If a step fails, use Lesson 4’s layered debugging approach (is the container running? is the service ready? can this specific container reach it by name?) to find where.
Hint
The most common failure is running seed before cityflow-db has finished starting up. If seed fails to connect, wait a few seconds and re-run it — docker logs cityflow-db will show you whether Postgres has printed database system is ready to accept connections yet.
Without changing the trips table or re-running seed, run one more disposable container (same image, same network) with a different query — for example, the single trip with the highest fare_amount. Confirm it reads the same five rows correctly.
Hint
docker run --rm --network cityflow-net -e PGPASSWORD=cityflow postgres:16-alpine psql -h cityflow-db -U postgres -d cityflow -c "SELECT * FROM trips ORDER BY fare_amount DESC LIMIT 1;" — same pattern as the report step, just a different -c query.
Try connecting to cityflow-db by name from your host terminal directly (not from inside a container) — for example with psql -h cityflow-db -U postgres -d cityflow. Explain why this fails, even though the exact same hostname worked perfectly from inside the seed and report containers.
Hint
Your host terminal isn’t attached to cityflow-net — that network’s name resolution only works between containers on the same network, not from the host. Your host would need -p 5433:5432 (like Lesson 4) and localhost, not the container’s own name, to connect directly.
You built and ran a complete, original multi-container project: a Docker network you created yourself, a long-running Postgres database attached to it, and two disposable containers — built from that exact same database image, distinguished only by the command each was given — that seeded and then reported on five real CityFlow trips. Every number was real: 5 trips, a $27.36 average fare, a 4.42-mile average distance, and $175.56 in total revenue, computed by Postgres and confirmed independently through docker network inspect and a real Docker Desktop screenshot. You then tore the whole thing down cleanly, leaving no trace.
docker network create — creates an isolated network that containers can join by name.--network <name> on docker run — attaches a container to that network, enabling name-based resolution between containers on it.-h <container-name>, no IP address or host port mapping required.seed and report are both just postgres:16-alpine given different commands; the image doesn’t determine the container’s job, the docker run command does.--rm) — a container built to do one task and exit is a normal, useful pattern, not a shortcut; it’s how seed and report behave here.This project is a miniature version of almost every real data pipeline you’ll build for the rest of this course and beyond: a persistent service holding state, and short-lived jobs that connect to it, do one thing, and exit. Module 4 formalizes container-to-container networking with Docker Compose; Module 7 runs this exact shape of job — a database plus one-off tasks — as a scheduled Kubernetes workload. The pattern you just built by hand with three separate docker run commands is the same pattern those later modules automate.
That completes Module 1: Getting Started with Docker. You can install and verify Docker on any machine, explain and demonstrate why containers solve a real environment-consistency problem, work confidently with images and containers as distinct things, run and verify a real service, and now, wire multiple containers together on a network you created yourself.
Next comes Module 2: Docker Fundamentals, where CityFlow stops relying entirely on official images and you build your own for the first time — writing a real Dockerfile, understanding why instruction order changes build speed, and learning to debug a container from the inside when something in your image goes wrong.
Keep DATATWEETS free. Help fund practical data, AI, and engineering lessons for learners worldwide.