Title here
Summary here
Lesson 1 proved this course’s Kind cluster is real, inspectable containers. This lesson covers the command that would have built it from nothing — kind create cluster — and then puts your hands on the cluster directly: running a real pod, watching its actual lifecycle, and cleaning it up.
By the end of this lesson, you will be able to:
kind create cluster does and what it needs, without having to run it yourself.kubectl run and read its state through the real stages Kubernetes reports.kubectl describe pod to read exactly what the scheduler and kubelet did, and when.kind create cluster doesThis course’s cluster, datatweets-docker-k8s, already exists and has been running for hours — every exercise in this module uses it directly rather than creating a new one, so nothing here pulls another multi-hundred-megabyte node image onto a machine that’s already tight on disk. But it’s worth knowing exactly what that one command would have done, because “a cluster” stops feeling mysterious once you know it’s the same kindest/node image Lesson 1 already showed you docker ps:
kind create cluster --helpCreates a local Kubernetes cluster using Docker container 'nodes'
Usage:
kind create cluster [flags]
Flags:
--config string path to a kind config file
-h, --help help for cluster
--image string node docker image to use for booting the cluster
--kubeconfig string sets kubeconfig path instead of $KUBECONFIG or $HOME/.kube/config
-n, --name string cluster name, overrides KIND_CLUSTER_NAME, config (default kind)
--retain retain nodes for debugging when cluster creation fails
--wait duration wait for control plane node to be ready (default 0s)Read literally, that first line of help text says the whole thing: “a local Kubernetes cluster using Docker container ’nodes’.” Running kind create cluster --name datatweets-docker-k8s does exactly what Lesson 1 dissected by hand — it pulls the kindest/node image if it isn’t already local, starts one container per node from it (one, in this course’s case), waits for the kubelet inside to report Ready, and writes a kubeconfig entry so kubectl knows how to reach it. This cluster’s own kubeconfig entry proves that last step already happened:
kind get clustersdatatweets-docker-k8skubectl config get-contexts kind-datatweets-docker-k8sCURRENT NAME CLUSTER AUTHINFO NAMESPACE
* kind-datatweets-docker-k8s kind-datatweets-docker-k8s kind-datatweets-docker-k8sThe * marks it as the active context — every kubectl command in this course is talking to this cluster specifically, unless told otherwise with --context.
Note
kubectl config get-contexts with no arguments lists every cluster your kubeconfig knows about, which on a real workstation can include clusters from entirely unrelated projects. This lesson scopes the command to this course’s context by name so nothing else on this machine shows up here — a good habit any time you run it for real.
A pod is the smallest thing Kubernetes actually schedules — one or more containers, sharing one network identity, moved and tracked as a single unit. kubectl run is the fastest way to create the simplest possible pod: exactly one container, from an image you name directly.
kubectl run nginx-demo --image=nginx:alpine --restart=Never -n defaultpod/nginx-demo created--restart=Never tells Kubernetes this is a one-off pod, not something a Deployment should manage and recreate — Lesson 3 is where recreation-on-failure becomes the whole point. Check on it immediately:
kubectl get pods -n defaultNAME READY STATUS RESTARTS AGE
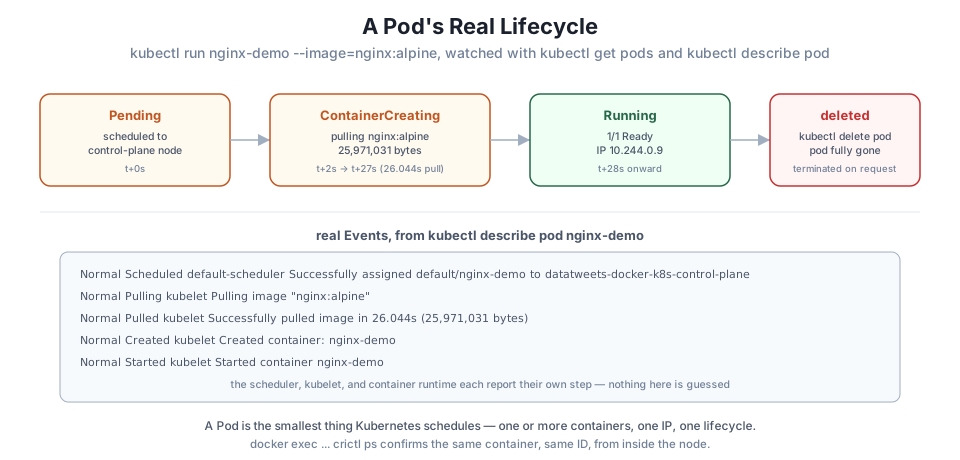
nginx-demo 0/1 ContainerCreating 0 1sContainerCreating — the scheduler has already placed this pod on a node, and the kubelet there is now pulling the image and starting the container. This is a real, distinct phase, not an instant transition — watch it a moment longer and it’s still going:
kubectl get pods -n defaultNAME READY STATUS RESTARTS AGE
nginx-demo 0/1 ContainerCreating 0 3skubectl wait is the correct way to actually block until a pod is ready, rather than polling by hand:
kubectl wait --for=condition=Ready pod/nginx-demo -n default --timeout=60spod/nginx-demo condition metkubectl get pods -n default -o wideNAME READY STATUS RESTARTS AGE IP NODE NOMINATED NODE READINESS GATES
nginx-demo 1/1 Running 0 28s 10.244.0.9 datatweets-docker-k8s-control-plane <none> <none>Running, 1/1 ready, with its own real pod IP, 10.244.0.9, on the cluster’s private pod network — a genuinely different address space from the node’s own 172.18.0.2.
describekubectl describe pod shows the full picture — not just the current state, but the sequence of real events the scheduler, kubelet, and container runtime each reported along the way:
kubectl describe pod nginx-demo -n defaultName: nginx-demo
Namespace: default
Priority: 0
Service Account: default
Node: datatweets-docker-k8s-control-plane/172.18.0.2
Start Time: Tue, 21 Jul 2026 20:01:02 +0330
Labels: run=nginx-demo
Status: Running
IP: 10.244.0.9
Containers:
nginx-demo:
Container ID: containerd://ab392467571855c4e0bfe59097d0ee1cd35bc63ebf7731a38bd012e11cbb0259
Image: nginx:alpine
Image ID: docker.io/library/nginx@sha256:4a73073bd557c65b759505da037898b61f1be6cbcc3c2c3aeac22d2a470c1752
State: Running
Started: Tue, 21 Jul 2026 20:01:29 +0330
Ready: True
Restart Count: 0
Conditions:
Type Status
PodReadyToStartContainers True
Initialized True
Ready True
ContainersReady True
PodScheduled True
QoS Class: BestEffort
Events:
Type Reason Age From Message
---- ------ ---- ---- -------
Normal Scheduled 28s default-scheduler Successfully assigned default/nginx-demo to datatweets-docker-k8s-control-plane
Normal Pulling 27s kubelet Pulling image "nginx:alpine"
Normal Pulled 1s kubelet Successfully pulled image "nginx:alpine" in 26.044s (26.044s including waiting). Image size: 25971031 bytes.
Normal Created 1s kubelet Created container: nginx-demo
Normal Started 1s kubelet Started container nginx-demoEvery line in Events is a real report from a real component: default-scheduler decided where this pod runs, kubelet pulled the image (26.044 seconds, 25,971,031 bytes), and only then created and started the container. Nothing about “the pod is Running” was assumed — it’s the sum of five separate, timestamped facts.
Confirm from one level down that this is a genuine container, not an abstraction layered on top of one:
docker exec datatweets-docker-k8s-control-plane crictl ps --name nginx-demoCONTAINER IMAGE CREATED STATE NAME ATTEMPT POD ID POD NAMESPACE
ab39246757185 28c4e91555d00 8 seconds ago Running nginx-demo 0 da8c85a9a9c61 nginx-demo defaultMatch the container ID: ab39246757185 is the same ID kubectl describe pod reported as containerd://ab392467571855c4e0bfe59097d0ee1cd35bc63ebf7731a38bd012e11cbb0259, just truncated. Same container, two tools, two different views into the same real cluster.
kubectl delete pod nginx-demo -n defaultpod "nginx-demo" deletedkubectl get pods -n defaultNo resources found in default namespace.A plain pod like this one has no controller behind it, so deleting it is the end of the story — nothing recreates it. That absence of recreation is exactly the gap Lesson 3’s Deployment closes.
Run kubectl run my-pod --image=nginx:alpine --restart=Never -n default yourself and immediately run kubectl get pods -n default two or three times a couple of seconds apart. Confirm you see ContainerCreating before Running.
Hint
If nginx:alpine is already cached on this machine’s Docker (it should be, from earlier modules), the pull step inside the node may be much faster than this lesson’s 26 seconds — Kind still has to pull it into the node’s containerd store separately from your host’s Docker image cache, but a warm layer cache elsewhere can still speed it up.
describe and crictlFor the pod you created in Exercise 1, run kubectl describe pod my-pod -n default and docker exec datatweets-docker-k8s-control-plane crictl ps --name my-pod, and confirm the container ID prefix matches between the two, the same way this lesson matched nginx-demo’s.
Hint
kubectl describe pod prints the full ID after containerd://; crictl ps prints only the short form in its CONTAINER column — the short form is always a prefix of the long one.
Delete the pod you created in Exercise 1 and confirm kubectl get pods -n default reports no resources, exactly as this lesson did for nginx-demo.
Hint
If you don’t remember the pod’s name, kubectl get pods -n default will show it before you delete it — there’s no need to have written it down.
kind create cluster does exactly what Lesson 1 showed you by hand: pull the kindest/node image, start one container per node, and wait for the kubelet inside to report ready. This course’s cluster already exists, so this lesson used it directly for kubectl run nginx-demo — a real pod whose lifecycle you watched through actual, distinct states: Pending, ContainerCreating (a real 26.044-second image pull), and Running, with a real pod IP, 10.244.0.9. kubectl describe pod showed the exact sequence of events behind that state — scheduled, pulling, pulled, created, started — each attributed to the real component that did it, and crictl ps confirmed the same container, same ID, from inside the node itself. Deleting the pod removed it with nothing to recreate it, which is precisely the gap Lesson 3 closes.
kind create cluster — pulls the kindest/node image, starts one container per node, waits for Ready, and configures kubectl to reach it.kubectl run --restart=Never — creates a single, unmanaged pod with no controller behind it to recreate it if it’s deleted or dies.kubectl wait — blocks until a real condition is met (Ready here), rather than polling by hand.Scheduled, Pulling, Pulled, Created, Started) behind every pod’s current status.Everything from here forward in this module builds on a pod behaving exactly the way this lesson showed: scheduled somewhere real, started for a real, checkable reason, and identifiable from both kubectl and the node’s own container runtime. Lesson 3 takes this same pod-level mechanic and wraps a controller around it — one that doesn’t just create a pod once, but keeps making sure the right number of them exist, continuously, which is the actual reconciliation loop Lesson 1 described in the abstract.
You’ve run and fully inspected one unmanaged pod. Lesson 3 introduces the controller that changes everything about what happens next: a Deployment that notices when a pod disappears and replaces it — watched live, on this same real cluster.
Keep DATATWEETS free. Help fund practical data, AI, and engineering lessons for learners worldwide.