Title here
Summary here
Before a single line of Polars code runs, you need somewhere for it to live. This lesson builds that somewhere for real: a project folder with an isolated Python environment and a layout that keeps raw data, processed output, and code cleanly separated. Every command below runs on your own machine — no cloud account, no container, no account sign-up.
By the end of this lesson, you will be able to:
data/raw/ and data/processed/ convention that scales to every later moduleIf you’ve never created a virtual environment before, this lesson assumes that and walks through it step by step. If you have, skim the setup and focus on the folder layout — it’s the part every later module in this course depends on.
Every Python installation on your machine has a global set of installed packages. If you pip install polars globally, that’s fine right up until a different project on the same machine needs a different version of something Polars also depends on — or until you want to hand this project to someone else and have it behave identically on their machine. A virtual environment solves this by giving one project its own private copy of Python’s package directory, isolated from everything else on the machine and from every other project you have.
You don’t need to have hit a version conflict yet to want this. Setting it up now, before Thistlewood Goods’ pipeline has a single dependency, costs about thirty seconds and means you’ll never have to untangle one later.
Picture the situation concretely: six months from now you’re maintaining this Thistlewood Goods project, pinned to Polars 1.43 because a later lesson depends on exact output formatting. At the same time, you start a second project that needs a brand-new Polars feature only available in a newer release. Without isolated environments, installing the newer version for the second project silently upgrades the only copy of Polars on your machine — including this project’s. The Thistlewood pipeline would still run, but with different behavior underneath it, and you might not notice until a number quietly changes. With a .venv per project, upgrading one project’s dependency simply can’t touch another’s; each project’s package directory is its own.
Before creating anything, confirm you have Python 3 available at all:
python3 --versionThis course spells it python3 because that’s the reliable spelling on macOS and Linux, where a bare python may not exist or may point at a system Python 2 on older installs. On Windows, use python (or the py launcher, e.g. py -3) instead — the standard python.org Windows installer does not create a python3 command by default. Whichever your system responds to, use that same spelling consistently for every command in this lesson.
Start with a plain directory — nothing special about the name, just something clear:
mkdir thistlewood-polars
cd thistlewood-polarsPython’s built-in venv module creates an isolated environment without installing anything extra:
python3 -m venv .venvThis creates a .venv/ directory containing an isolated site-packages (Python’s package-install location) plus a python command that resolves into that isolated environment — on most systems it’s a lightweight reference to your existing Python install, not a full second copy of the interpreter. What matters is that packages installed while .venv is active land only in .venv/, not system-wide. Nothing is installed into it yet — that’s Lesson 4’s job.
Creating the environment isn’t enough on its own; you have to activate it so your terminal actually uses it:
source .venv/bin/activate(On Windows, the equivalent is .venv\Scripts\activate.)
Once activated, your prompt usually grows a (.venv) prefix, and — more reliably than eyeballing the prompt — which python now points inside the project instead of at your system Python:
which python/path/to/thistlewood-polars/.venv/bin/pythonThat path is the proof it worked: every pip install and every python command from here on, in this terminal, uses this project’s private copy, not your system-wide one. When you’re done working, deactivate returns you to your normal shell.
Why .venv and not venv
Either name works — venv, env, and .venv are all common. This course uses .venv because the leading dot keeps it out of the way in a plain ls and matches the convention most Python tooling (and this course’s own build scripts) expects by default.
Two problems account for almost every virtual environment issue a beginner hits:
PATH. Reinstalling Python from python.org (and, on Windows, checking “Add Python to PATH” during install) resolves this in almost every case..venv in a terminal only affects that terminal. If you’re using an editor like VS Code, it typically needs to be told separately which interpreter to use (usually a command-palette action like “Python: Select Interpreter”), even after you’ve activated the environment in a terminal panel.Both are configuration problems, not code problems — worth ruling out early, since a ModuleNotFoundError for something you’re sure you installed is usually one of these two causes.
A single script that both reads and writes files works for a five-minute experiment. It stops working the moment you need to know, at a glance, “is this the original data, or something a script produced?” — a question that matters a lot once cleaning, joins, and multiple pipeline stages enter the picture in later modules. Separating raw and processed data from the start avoids that confusion permanently.
mkdir -p data/raw data/processed notebooks
touch pipeline.py requirements.txt .gitignore
(On Windows PowerShell, touch doesn’t exist — use New-Item pipeline.py, requirements.txt, .gitignore instead. mkdir -p also isn’t a PowerShell flag; create the three directories with mkdir data/raw, data/processed, notebooks and PowerShell will create any missing parent folders on its own.)
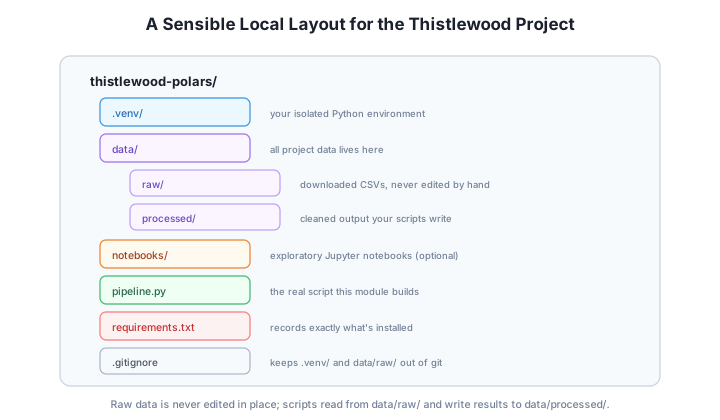
The rule that makes this layout worth having is simple and worth stating explicitly: data/raw/ is read-only, by convention. Nothing you write ever edits a file inside it — every script reads from data/raw/ and writes its output into data/processed/. If a script has a bug and corrupts its output, you delete the bad file in data/processed/ and re-run; the original data was never at risk. Lesson 5’s guided project follows exactly this convention: the Thistlewood Goods CSV lands in data/raw/, and any summary you write out goes to data/processed/.
.venv/ — the isolated environment from the section above. It never gets committed to version control (see .gitignore below) because it’s fully reproducible from requirements.txt.data/raw/ — exactly what you downloaded or were given, untouched.data/processed/ — anything a script computed: cleaned tables, summaries, exports.notebooks/ — optional, for exploratory work in Jupyter if you use it. This course’s own examples are plain scripts, but nothing stops you from exploring interactively first.pipeline.py — the real script you’ll build up starting in Lesson 4.requirements.txt — a plain-text record of exactly which packages (and versions) this project needs, so the environment is reproducible on another machine..gitignore — keeps .venv/ and anything large or generated out of version control.If you’re tracking this project with git, three lines cover the essentials:
.venv/
data/processed/
__pycache__/
data/raw/ is deliberately not listed here — but that’s a call specific to this course, not general advice. Thistlewood Goods’ files are small (a few megabytes) and public, so tracking them alongside the code that reads them is convenient. Real production raw data is often large, private, licensed, or regenerated on demand, and belongs in .gitignore with a documented download/reproduction step instead — decide this per project, not by default. data/processed/ is regenerable output either way, and never needs to live in version control.
Before moving on, confirm the pieces are actually in place. This is a small, genuinely runnable check — no Polars yet, just the standard library confirming the structure and the active interpreter:
import os
import sys

expected_dirs = ["data/raw", "data/processed", "notebooks"]
expected_files = ["pipeline.py", "requirements.txt", ".gitignore"]

print("Python executable in use:")
print(" ", sys.executable)

print("\nExpected directories:")
for path in expected_dirs:
    print(f"  {path:20s} exists={os.path.isdir(path)}")

print("\nExpected files:")
for path in expected_files:
    print(f"  {path:20s} exists={os.path.isfile(path)}")
Run this from inside thistlewood-polars/ with your virtual environment activated, and every line should read True and the interpreter path should point inside .venv/. If something reads False, that’s a directory or file the setup steps above missed — go back and create it before continuing.
Hint if a path reads False
This check uses relative paths, so it only works if you run it from inside the thistlewood-polars/ directory itself. If everything shows False, check your current directory with pwd (macOS/Linux) first.
Create the full thistlewood-polars/ project on your own machine, following every step in this lesson: the virtual environment, activation, the folder structure, and the three placeholder files. Run the verification script and confirm every check reads True.
In your own words (two or three sentences), explain why data/raw/ being treated as read-only matters once a pipeline has more than one processing step. What specifically goes wrong if a cleaning script is allowed to overwrite the raw file it reads from?
Hint
Think about what happens if that cleaning script has a bug and you need to re-run it from the original data to compare — what still exists, and what doesn’t, in each design?
A Polars project starts the same way any serious Python project should: an isolated virtual environment so dependencies never collide with anything else on your machine, and a folder layout that keeps raw data, processed output, and code in clearly separate places. Neither of these involves Polars itself yet — they’re the foundation everything from Lesson 4 onward gets built on top of.
venv) — an isolated package-install location and python command, private to one project, so its dependencies never collide with another project’s or the system Python’s.python and pip at the virtual environment instead of the system-wide installation.data/raw/ vs. data/processed/ — a convention where original data is never edited in place, and every script’s output goes into a separate, regenerable location.The projects that stay maintainable months later are rarely the ones with the cleverest code — they’re the ones where anyone (including a future version of you) can look at the folder and immediately tell what’s original data, what’s generated, and what’s safe to delete and regenerate. That clarity costs almost nothing to set up now and saves real confusion later.
The project folder is ready. Lesson 4 installs Polars into it for real and runs your first genuine pipeline: read, filter, aggregate, print.
Keep DATATWEETS free. Help fund practical data, AI, and engineering lessons for learners worldwide.