Title here
Summary here
You have queried databases directly with SQL, and you have called that SQL from Python with sqlite3. In this lesson you meet SQLAlchemy, a library that goes one step further: instead of writing SQL strings and reading back tuples, you describe your database in Python and let SQLAlchemy generate the SQL for you.
SQLAlchemy has two layers. Core lets you define tables as Python objects and build queries with method calls — select(), where(), join() — that compile down to the exact SQL you would have written by hand. The ORM (Object-Relational Mapper), which you will meet in Lesson 6, goes further still and maps those tables onto full Python classes. This module starts with Core, because everything the ORM does is built on top of it.
By the end of this lesson, you will be able to:
Engine with create_engine()Connection and understand how it relates to the Engineinspect()Table object with MetaDatatext() and bound parametersA little sqlite3 experience is all you need. Let’s begin.
Data for this lesson
Database: employees.db — a small staff table (SQLite).
Table used: employees (columns: id, name, job, mgr, hiredate, sal, comm, dept)
Place it in your working directory before running the examples.
SQLAlchemy is not part of the standard library, so install it first:
pip install sqlalchemyThis module uses SQLAlchemy 2.0, the current major version. You can confirm your installed version from Python:
import sqlalchemy
print(sqlalchemy.__version__)
Output:
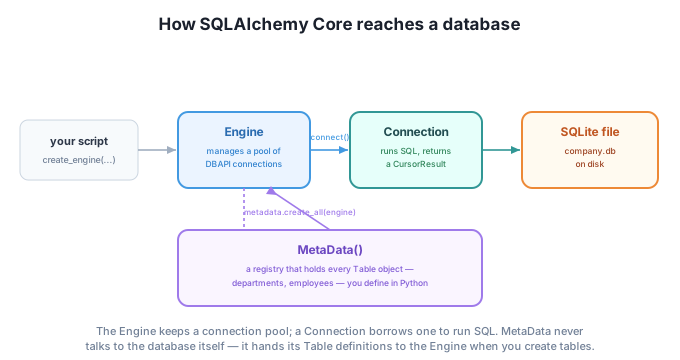
2.0.51Everything in SQLAlchemy starts with an Engine — an object that knows how to talk to a specific database and manages a small pool of connections to it. You create one with create_engine(), passing a connection string that names the database dialect and location:
from sqlalchemy import create_engine

engine = create_engine("sqlite:///employees.db")
print(engine)
Output:
Engine(sqlite:///employees.db)The string "sqlite:///employees.db" breaks down into two parts: sqlite tells SQLAlchemy which dialect to speak, and employees.db is the path to the file, relative to your working directory. Swapping to PostgreSQL or MySQL later would mean changing this one string — most of your Core code stays the same regardless of which database sits underneath it.
Note
Creating an Engine does not open a connection. SQLAlchemy connects lazily, the first time you actually need to run a query. create_engine() just prepares the configuration.
To actually talk to the database, you open a Connection from the engine — almost always as a context manager, so it is released automatically when you are done:
with engine.connect() as conn:
    print(conn)
Output:
<sqlalchemy.engine.base.Connection object at 0x7f2a1c0d3d90>Before you can query a table, it helps to see what tables exist. SQLAlchemy’s inspect() function wraps an engine (or connection) in an Inspector, which can answer questions about the database’s structure without you writing any SQL:
from sqlalchemy import inspect

inspector = inspect(engine)
print(inspector.get_table_names())
Output:
['employees']The inspector can tell you more than just table names — you will use get_columns() and get_foreign_keys() throughout this module to check a table’s structure before writing queries against it.
Once you know a table exists, you need a Python object that represents it so Core can build queries against it. That object is a Table, and every Table you create is registered inside a MetaData container:
from sqlalchemy import MetaData

metadata = MetaData()
Think of MetaData as a catalog: it does not talk to the database itself, but it keeps track of every table you define so that operations like “create all these tables” can act on the whole set at once. You will see that in Lesson 2, when you define new tables from scratch. In this lesson, the employees table already exists in employees.db, so instead of describing it by hand, you reflect it — you ask SQLAlchemy to read the table’s structure from the database itself.
Pass autoload_with=engine to Table() and SQLAlchemy queries the database’s own schema information to build the Table object for you:
from sqlalchemy import Table

employees = Table("employees", metadata, autoload_with=engine)
print(employees.columns.keys())
Output:
['id', 'name', 'job', 'mgr', 'hiredate', 'sal', 'comm', 'dept']employees is now a Python object with one attribute per column, accessible either through .columns.keys() for the names or by iterating .columns for full detail — name, type, and constraints:
for column in employees.columns:
    print(column.name, column.type, "primary_key=" + str(column.primary_key))
Output:
id INTEGER primary_key=True
name VARCHAR(20) primary_key=False
job VARCHAR(20) primary_key=False
mgr INTEGER primary_key=False
hiredate DATETIME primary_key=False
sal NUMERIC(7, 2) primary_key=False
comm NUMERIC(7, 2) primary_key=False
dept INTEGER primary_key=False
SQLAlchemy read the column names, SQL types, and the primary key straight out of SQLite’s own schema — you never typed a CREATE TABLE statement or a column type. Reflection like this is especially useful when you are working against a database you did not design yourself, or exploring one for the first time.
You will spend most of this module building queries with Core’s select(), insert(), update(), and delete() — covered starting in Lesson 3. But sometimes you want to run a plain SQL string, and SQLAlchemy still gives you a safe way to do that: text().
from sqlalchemy import text

with engine.connect() as conn:
    stmt = text("SELECT name, job, sal FROM employees WHERE dept = :dept ORDER BY sal DESC")
    result = conn.execute(stmt, {"dept": 4})
    for row in result:
        print(row)
Output:
('JACKSON', 'CEO', 75000)
('GARFIELD', 'MANAGER', 54000)
('POLK', 'TECH', 25000)
('LINCOLN', 'TECH', 22500)
('JOHNSON', 'ADMIN', 18000)
('WASHINGTON', 'ADMIN', 18000)
Notice the :dept placeholder and the dictionary passed alongside the statement. This is a bound parameter — SQLAlchemy sends the value separately from the SQL text, the same protection against SQL injection you saw with prepared statements earlier in this course. Never build a query by pasting a value directly into a string with an f-string or % formatting; always pass it through a bound parameter like this one.
Tip
Reach for text() when you need a specific SQL feature Core does not model directly, or when you are porting an existing SQL script. For everything else, the Core query-building methods in the rest of this module give you more flexibility — you can add a .where() or a .join() to a query object without touching a string.
Assume employees.db is in your working directory, with the employees table described above.
Create an engine for employees.db, then use inspect() to print the list of table names it contains.
# Your code hereHint
create_engine("sqlite:///employees.db") builds the engine; inspect(engine).get_table_names() returns the list.
Reflect the employees table into a Table object using a MetaData instance, then print its column names.
# Your code hereHint
Table("employees", metadata, autoload_with=engine) reflects the table; .columns.keys() lists the names.
Using text(), write a query that returns the name and sal of every employee in department 3, ordered by sal ascending, using a bound parameter for the department number.
# Your code hereHint
text("SELECT name, sal FROM employees WHERE dept = :dept ORDER BY sal ASC"), executed with {"dept": 3}.
You installed SQLAlchemy, created an Engine with create_engine(), and learned that the engine manages connections lazily rather than connecting immediately. You used inspect() to list tables without writing SQL, then used a MetaData registry together with Table(..., autoload_with=engine) to reflect an existing table’s columns and types straight out of the database. Finally, you ran a raw SQL string safely with text() and a bound parameter.
create_engine() — builds an Engine, the object that manages connections to a specific database.Engine — represents a database and a pool of connections to it; connects lazily on first use.Connection — an open link to the database, created with engine.connect(), best used as a context manager.inspect() — wraps an engine in an Inspector that can report table names, columns, and foreign keys.MetaData — a registry that tracks every Table object you define or reflect.Table object by reading an existing table’s structure from the database with autoload_with=engine.text() — runs a raw SQL string with safe, bound parameters.Nearly every SQLAlchemy program starts with these same three steps: create an engine, inspect or reflect what is already there, and open a connection to run queries. Reflection in particular is a shortcut you will use constantly once you leave tutorial datasets behind — most of the databases you touch in a real job already exist, with schemas someone else designed, and SQLAlchemy can read that structure for you instead of you retyping it by hand.
You have made your first connection with SQLAlchemy and seen how much structure it can read from a database automatically. In the next lesson you will go the other direction — defining brand-new tables from scratch with Table() and Column(), adding constraints and a foreign key, and inserting your own data.
Keep DATATWEETS free. Help fund practical data, AI, and engineering lessons for learners worldwide.